Zvezda Castle tower experimenting 1, W.I.P. 1

A while back i was exploring a local book and game store called the griffon I made discovery of zvesta company of products.
Specifically there awesome castle terrain pieces. Ive gone back several times and cleared out ll the stuck they have of these kits.
In this blog post I'm going to show you the results of those terrain peices I've built already and my crazy idea to modify them.
The focus will be the Trap doors that are a static unmoving decorative relieve in the plastic floors of each tower. Now there is no real need to make these modification for any R.P.G. or any use of gaming with these towers.this is simply my fun personal challenge.
This a group shot of all the tower kits from Zvezda company I have made so far. 
Tgere are three standard square stone towers, one drawbridge tower and gate hpuse tower. I have to say I'm very pleased with all there product I had time to work with. On a later date I'll go into more indepth review of all there models I've bought so far. Only the drawbighe tower gave me any real problems.
So the plan so far is carefuly cut all the doors out of the hatch way leaving the e6details of the wood frame work amongst stone floor, than to attempt the door with hinges and a functional handle ring on the door itself. I will drawing plansup for a couple different ways to go about this, as well as making on a to make my own molds to caste in resin a few variants of trap doors that can simply be added to future buildings kits.
These are tower tops that I have already built, I have been able to remove the Trap doors quite even after the assembling them. It can be tricky of course to do this, I do recommend cutting out the Trap door of the floor out before assembly this far.
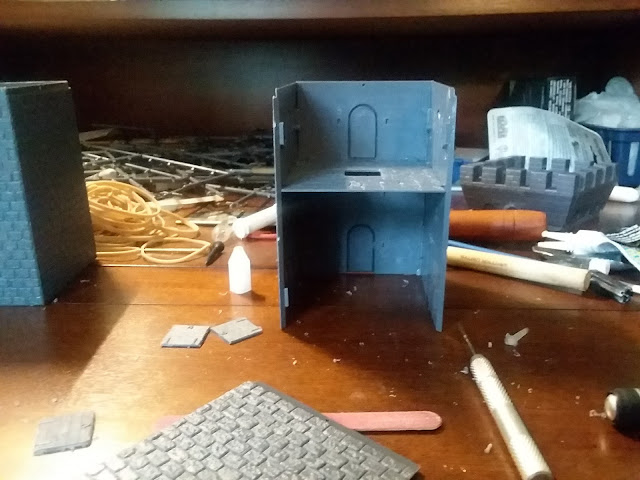
In the photo above you can see inner floor level with trap door removed. I used stand drill to place while in each corner of the wood frame of the stone floor to make the cutti g through the sides not only easier but prevent cutting to far past the frame. The nail file was used to clean up all the edges of the floor and the cut away door.
A great photo of the crazy mess andfun tbis pronect has brought about at my hobby desk.
This a drawbridge tower that I several difficulties with mostly little rounds here and there snapping on me I have repaired this tower 4 times already and it's waiting on its 5th.  Still  So much fun. Beside it is a wonderful chino style skeleton miniature from reaper miniatures.

Thegate tower  next to drawbridge. 

Comments

Popular posts from this blog

Death Guard power pack conversion WIP

Continue the work cutting up the models to find I want use to create something can be fun. It does create the issue sometimes being so involved one forgets to take photos. The idea behind all this work is trying a make these power pack not only more appealing to me but make more functional in the fictional sense of making sure these packs have the jet exhausted as intend in all power. It's something I just need to be there for my own sanity. Looking at my work table you can see the freed power packs from Death Guard starter box as well as the power packs from chaos booster box for lack other term. The first power pack being my favorite from the box with central skull on the back and the tentacles holding the plasma gun. The plasma gun was removed at set aside to be clean up for another conversion in progress. With removing the plasma gun it did prosent the problem of the lower combonets damage or removed in the process. I'll use the similar price from the older chaos marin...

Chaos Hounds Converson W.I.P. 1

So bot a box of ten chaos hounds a while back with the intention of converting them into wolf's for space wolf chapter. Shortly after purchase I saw first preview for the fenris wolf's pack. Needless to say the box of hounds got put on the shelf. Now I've changed plans and now will convert them into giant wolf rats for use with Skaven army or a unique space marine chapter still in development. A quick look of what I have so far. So first thing I've done was cut and reshape the plasted at the end of the hound so I can replace the short tails with a custom made rat tail. To do this I've taken gardening wire cut into a short length and a tear shape hope at one end. Then place a smaller amount of greenstuff on the inside and pressed the loop into the greenstuff, added super glue to inside then clapped shut. Each of the chaos hound body half's have corrasponding numbers which help so much if keeping project moving smoothly. ...

Necromunda House Escher bolter conversion WIP 1

After looking over the necromunda gang house Escher box I decide I really wanted to started out with jumping into converting many of the weapons. The aim of my immediate work will to get many of the weapons cleaned up and fine to the basic form. First of these weapons will be the gang leaders range weapons the combi bolter/needler. I hope lay the ground work for future conversion of this fun bolter gun, first step will to take of the leaders arm from the bit of the spru, than clean up by saving the material and sanding where I can as much as possible. This is going to take some time for extra focus to detail and precision cuts, while there are two of these weapons in the box I rather not have to use that one yet. This a rough drawing next to the spru bit and my general idea and aim. So once I have the House Escher bolter down to its basic form it will open a create desk of opportunity for expanding armament options for house Escher gangs or any other warhammer faction that c...